3. ViNePerf Traffic Gen Guide
3.1. Overview
ViNePerf supports the following traffic generators:
Dummy (DEFAULT)
To see the list of traffic gens from the cli:
$ ./vsperf --list-trafficgens
This guide provides the details of how to install and configure the various traffic generators.
3.2. Background Information
The traffic default configuration can be found in conf/03_traffic.conf, and is configured as follows:
TRAFFIC = {
    'traffic_type' : 'rfc2544_throughput',
    'frame_rate' : 100,
    'burst_size' : 100,
    'bidir' : 'True',  # will be passed as string in title format to tgen
    'multistream' : 0,
    'stream_type' : 'L4',
    'pre_installed_flows' : 'No',           # used by vswitch implementation
    'flow_type' : 'port',                   # used by vswitch implementation
    'flow_control' : False,                 # supported only by IxNet
    'learning_frames' : True,               # supported only by IxNet
    'l2': {
        'framesize': 64,
        'srcmac': '00:00:00:00:00:00',
        'dstmac': '00:00:00:00:00:00',
    },
    'l3': {
        'enabled': True,
        'proto': 'udp',
        'srcip': '1.1.1.1',
        'dstip': '90.90.90.90',
    },
    'l4': {
        'enabled': True,
        'srcport': 3000,
        'dstport': 3001,
    },
    'vlan': {
        'enabled': False,
        'id': 0,
        'priority': 0,
        'cfi': 0,
    },
    'capture': {
        'enabled': False,
        'tx_ports' : [0],
        'rx_ports' : [1],
        'count': 1,
        'filter': '',
    },
    'scapy': {
        'enabled': False,
        '0' : 'Ether(src={Ether_src}, dst={Ether_dst})/'
              'Dot1Q(prio={Dot1Q_prio}, id={Dot1Q_id}, vlan={Dot1Q_vlan})/'
              'IP(proto={IP_proto}, src={IP_src}, dst={IP_dst})/'
              '{IP_PROTO}(sport={IP_PROTO_sport}, dport={IP_PROTO_dport})',
        '1' : 'Ether(src={Ether_dst}, dst={Ether_src})/'
              'Dot1Q(prio={Dot1Q_prio}, id={Dot1Q_id}, vlan={Dot1Q_vlan})/'
              'IP(proto={IP_proto}, src={IP_dst}, dst={IP_src})/'
              '{IP_PROTO}(sport={IP_PROTO_dport}, dport={IP_PROTO_sport})',
    },
    'latency_histogram': {
        'enabled': False,
        'type': 'Default',
    },
    'imix': {
        'enabled': True,
        'type': 'genome',
        'genome': 'aaaaaaaddddg',
    },
}
A detailed description of the TRAFFIC dictionary can be found at
Configuration of TRAFFIC dictionary.
The framesize parameter can be overridden from the configuration
files by adding the following to your custom configuration file
10_custom.conf:
TRAFFICGEN_PKT_SIZES = (64, 128,)
OR from the commandline:
$ ./vsperf --test-params "TRAFFICGEN_PKT_SIZES=(x,y)" $TESTNAME
You can also modify the traffic transmission duration and the number of tests run by the traffic generator by extending the example commandline above to:
$ ./vsperf --test-params "TRAFFICGEN_PKT_SIZES=(x,y);TRAFFICGEN_DURATION=10;" \
                         "TRAFFICGEN_RFC2544_TESTS=1" $TESTNAME
If you use imix, set the TRAFFICGEN_PKT_SIZES to 0.
TRAFFICGEN_PKT_SIZES = (0,)
3.3. Dummy
The Dummy traffic generator can be used to test ViNePerf installation or to demonstrate ViNePerf functionality at DUT without connection to a real traffic generator.
You could also use the Dummy generator in case, that your external traffic generator is not supported by ViNePerf. In such case you could use ViNePerf to setup your test scenario and then transmit the traffic. After the transmission is completed you could specify values for all collected metrics and ViNePerf will use them to generate final reports.
3.3.1. Setup
To select the Dummy generator please add the following to your
custom configuration file 10_custom.conf.
TRAFFICGEN = 'Dummy'
OR run vsperf with the --trafficgen argument
$ ./vsperf --trafficgen Dummy $TESTNAME
Where $TESTNAME is the name of the vsperf test you would like to run. This will setup the vSwitch and the VNF (if one is part of your test) print the traffic configuration and prompt you to transmit traffic when the setup is complete.
Please send 'continuous' traffic with the following stream config:
30mS, 90mpps, multistream False
and the following flow config:
{
    "flow_type": "port",
    "l3": {
        "enabled": True,
        "srcip": "1.1.1.1",
        "proto": "udp",
        "dstip": "90.90.90.90"
    },
    "traffic_type": "rfc2544_continuous",
    "multistream": 0,
    "bidir": "True",
    "vlan": {
        "cfi": 0,
        "priority": 0,
        "id": 0,
        "enabled": False
    },
    "l4": {
        "enabled": True,
        "srcport": 3000,
        "dstport": 3001,
    },
    "frame_rate": 90,
    "l2": {
        "dstmac": "00:00:00:00:00:00",
        "srcmac": "00:00:00:00:00:00",
        "framesize": 64
    }
}
What was the result for 'frames tx'?
When your traffic generator has completed traffic transmission and provided the results please input these at the ViNePerf prompt. ViNePerf will try to verify the input:
Is '$input_value' correct?
Please answer with y OR n.
ViNePerf will ask you to provide a value for every of collected metrics. The list of metrics can be found at traffic-type-metrics. Finally vsperf will print out the results for your test and generate the appropriate logs and report files.
3.3.2. Metrics collected for supported traffic types
Below you could find a list of metrics collected by ViNePerf for each of supported traffic types.
RFC2544 Throughput and Continuous:
frames tx
frames rx
min latency
max latency
avg latency
frameloss
RFC2544 Back2back:
b2b frames
b2b frame loss %
3.3.3. Dummy result pre-configuration
In case of a Dummy traffic generator it is possible to pre-configure the test results. This is useful for creation of demo testcases, which do not require a real traffic generator. Such testcase can be run by any user and it will still generate all reports and result files.
Result values can be specified within TRAFFICGEN_DUMMY_RESULTS dictionary,
where every of collected metrics must be properly defined. Please check the list
of traffic-type-metrics.
Dictionary with dummy results can be passed by CLI argument --test-params
or specified in Parameters section of testcase definition.
Example of testcase execution with dummy results defined by CLI argument:
$ ./vsperf back2back --trafficgen Dummy --test-params \
  "TRAFFICGEN_DUMMY_RESULTS={'b2b frames':'3000','b2b frame loss %':'0.0'}"
Example of testcase definition with pre-configured dummy results:
{
    "Name": "back2back",
    "Traffic Type": "rfc2544_back2back",
    "Deployment": "p2p",
    "biDirectional": "True",
    "Description": "LTD.Throughput.RFC2544.BackToBackFrames",
    "Parameters" : {
        'TRAFFICGEN_DUMMY_RESULTS' : {'b2b frames':'3000','b2b frame loss %':'0.0'}
    },
},
NOTE: Pre-configured results for the Dummy traffic generator will be used only
in case, that the Dummy traffic generator is used. Otherwise the option
TRAFFICGEN_DUMMY_RESULTS will be ignored.
3.4. Ixia
ViNePerf can use both IxNetwork and IxExplorer TCL servers to control Ixia chassis. However, usage of IxNetwork TCL server is a preferred option. The following sections will describe installation and configuration of IxNetwork components used by ViNePerf.
3.4.1. Installation
On the system under the test you need to install IxNetworkTclClient$(VER_NUM)Linux.bin.tgz.
On the IXIA client software system you need to install IxNetwork TCL server. After its installation you should configure it as follows:
Find the IxNetwork TCL server app (start -> All Programs -> IXIA -> IxNetwork -> IxNetwork_$(VER_NUM) -> IxNetwork TCL Server)
Right click on IxNetwork TCL Server, select properties - Under shortcut tab in the Target dialogue box make sure there is the argument “-tclport xxxx” where xxxx is your port number (take note of this port number as you will need it for the 10_custom.conf file).
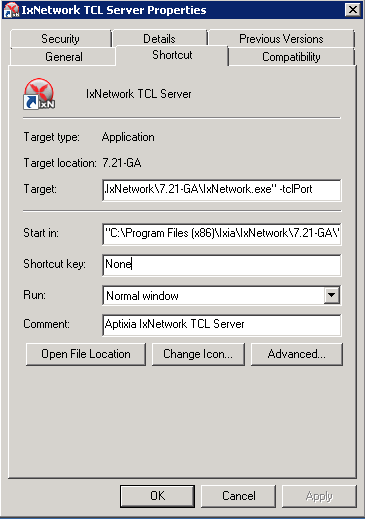
Hit Ok and start the TCL server application
3.4.2. ViNePerf configuration
There are several configuration options specific to the IxNetwork traffic generator from IXIA. It is essential to set them correctly, before the ViNePerf is executed for the first time.
Detailed description of options follows:
TRAFFICGEN_IXNET_MACHINE- IP address of server, where IxNetwork TCL Server is running
TRAFFICGEN_IXNET_PORT- PORT, where IxNetwork TCL Server is accepting connections from TCL clients
TRAFFICGEN_IXNET_USER- username, which will be used during communication with IxNetwork TCL Server and IXIA chassis
TRAFFICGEN_IXIA_HOST- IP address of IXIA traffic generator chassis
TRAFFICGEN_IXIA_CARD- identification of card with dedicated ports at IXIA chassis
TRAFFICGEN_IXIA_PORT1- identification of the first dedicated port atTRAFFICGEN_IXIA_CARDat IXIA chassis; ViNePerf uses two separated ports for traffic generation. In case of unidirectional traffic, it is essential to correctly connect 1st IXIA port to the 1st NIC at DUT, i.e. to the first PCI handle fromWHITELIST_NICSlist. Otherwise traffic may not be able to pass through the vSwitch. NOTE: In case thatTRAFFICGEN_IXIA_PORT1andTRAFFICGEN_IXIA_PORT2are set to the same value, then ViNePerf will assume, that there is only one port connection between IXIA and DUT. In this case it must be ensured, that chosen IXIA port is physically connected to the first NIC fromWHITELIST_NICSlist.
TRAFFICGEN_IXIA_PORT2- identification of the second dedicated port atTRAFFICGEN_IXIA_CARDat IXIA chassis; ViNePerf uses two separated ports for traffic generation. In case of unidirectional traffic, it is essential to correctly connect 2nd IXIA port to the 2nd NIC at DUT, i.e. to the second PCI handle fromWHITELIST_NICSlist. Otherwise traffic may not be able to pass through the vSwitch. NOTE: In case thatTRAFFICGEN_IXIA_PORT1andTRAFFICGEN_IXIA_PORT2are set to the same value, then ViNePerf will assume, that there is only one port connection between IXIA and DUT. In this case it must be ensured, that chosen IXIA port is physically connected to the first NIC fromWHITELIST_NICSlist.
TRAFFICGEN_IXNET_LIB_PATH- path to the DUT specific installation of IxNetwork TCL API
TRAFFICGEN_IXNET_TCL_SCRIPT- name of the TCL script, which ViNePerf will use for communication with IXIA TCL server
TRAFFICGEN_IXNET_TESTER_RESULT_DIR- folder accessible from IxNetwork TCL server, where test results are stored, e.g.c:/ixia_results; see test-results-share
TRAFFICGEN_IXNET_DUT_RESULT_DIR- directory accessible from the DUT, where test results from IxNetwork TCL server are stored, e.g./mnt/ixia_results; see test-results-share
3.5. Spirent Setup
Spirent installation files and instructions are available on the Spirent support website at:
Select a version of Spirent TestCenter software to utilize. This example will use Spirent TestCenter v4.57 as an example. Substitute the appropriate version in place of ‘v4.57’ in the examples, below.
3.5.1. On the CentOS 7 System
Download and install the following:
Spirent TestCenter Application, v4.57 for 64-bit Linux Client
3.5.2. Spirent Virtual Deployment Service (VDS)
Spirent VDS is required for both TestCenter hardware and virtual chassis in the vsperf environment. For installation, select the version that matches the Spirent TestCenter Application version. For v4.57, the matching VDS version is 1.0.55. Download either the ova (VMware) or qcow2 (QEMU) image and create a VM with it. Initialize the VM according to Spirent installation instructions.
3.5.3. Using Spirent TestCenter Virtual (STCv)
STCv is available in both ova (VMware) and qcow2 (QEMU) formats. For VMware, download:
Spirent TestCenter Virtual Machine for VMware, v4.57 for Hypervisor - VMware ESX.ESXi
Virtual test port performance is affected by the hypervisor configuration. For best practice results in deploying STCv, the following is suggested:
Create a single VM with two test ports rather than two VMs with one port each
Set STCv in DPDK mode
Give STCv 2*n + 1 cores, where n = the number of ports. For vsperf, cores = 5.
Turning off hyperthreading and pinning these cores will improve performance
Give STCv 2 GB of RAM
To get the highest performance and accuracy, Spirent TestCenter hardware is recommended. vsperf can run with either stype test ports.
3.5.4. Using STC REST Client
The stcrestclient package provides the stchttp.py ReST API wrapper module. This allows simple function calls, nearly identical to those provided by StcPython.py, to be used to access TestCenter server sessions via the STC ReST API. Basic ReST functionality is provided by the resthttp module, and may be used for writing ReST clients independent of STC.
Project page: <https://github.com/Spirent/py-stcrestclient>
Package download: <https://pypi.python.org/project/stcrestclient>
To use REST interface, follow the instructions in the Project page to install the package. Once installed, the scripts named with ‘rest’ keyword can be used. For example: testcenter-rfc2544-rest.py can be used to run RFC 2544 tests using the REST interface.
3.5.5. Configuration:
The Labserver and license server addresses. These parameters applies to all the tests, and are mandatory for all tests.
TRAFFICGEN_STC_LAB_SERVER_ADDR = " "
TRAFFICGEN_STC_LICENSE_SERVER_ADDR = " "
TRAFFICGEN_STC_PYTHON2_PATH = " "
TRAFFICGEN_STC_TESTCENTER_PATH = " "
TRAFFICGEN_STC_TEST_SESSION_NAME = " "
TRAFFICGEN_STC_CSV_RESULTS_FILE_PREFIX = " "
For RFC2544 tests, the following parameters are mandatory
TRAFFICGEN_STC_EAST_CHASSIS_ADDR = " "
TRAFFICGEN_STC_EAST_SLOT_NUM = " "
TRAFFICGEN_STC_EAST_PORT_NUM = " "
TRAFFICGEN_STC_EAST_INTF_ADDR = " "
TRAFFICGEN_STC_EAST_INTF_GATEWAY_ADDR = " "
TRAFFICGEN_STC_WEST_CHASSIS_ADDR = ""
TRAFFICGEN_STC_WEST_SLOT_NUM = " "
TRAFFICGEN_STC_WEST_PORT_NUM = " "
TRAFFICGEN_STC_WEST_INTF_ADDR = " "
TRAFFICGEN_STC_WEST_INTF_GATEWAY_ADDR = " "
TRAFFICGEN_STC_RFC2544_TPUT_TEST_FILE_NAME
RFC2889 tests: Currently, the forwarding, address-caching, and address-learning-rate tests of RFC2889 are supported. The testcenter-rfc2889-rest.py script implements the rfc2889 tests. The configuration for RFC2889 involves test-case definition, and parameter definition, as described below. New results-constants, as shown below, are added to support these tests.
Example of testcase definition for RFC2889 tests:
{
    "Name": "phy2phy_forwarding",
    "Deployment": "p2p",
    "Description": "LTD.Forwarding.RFC2889.MaxForwardingRate",
    "Parameters" : {
        "TRAFFIC" : {
            "traffic_type" : "rfc2889_forwarding",
        },
    },
}
For RFC2889 tests, specifying the locations for the monitoring ports is mandatory. Necessary parameters are:
TRAFFICGEN_STC_RFC2889_TEST_FILE_NAME
TRAFFICGEN_STC_EAST_CHASSIS_ADDR = " "
TRAFFICGEN_STC_EAST_SLOT_NUM = " "
TRAFFICGEN_STC_EAST_PORT_NUM = " "
TRAFFICGEN_STC_EAST_INTF_ADDR = " "
TRAFFICGEN_STC_EAST_INTF_GATEWAY_ADDR = " "
TRAFFICGEN_STC_WEST_CHASSIS_ADDR = ""
TRAFFICGEN_STC_WEST_SLOT_NUM = " "
TRAFFICGEN_STC_WEST_PORT_NUM = " "
TRAFFICGEN_STC_WEST_INTF_ADDR = " "
TRAFFICGEN_STC_WEST_INTF_GATEWAY_ADDR = " "
TRAFFICGEN_STC_VERBOSE = "True"
TRAFFICGEN_STC_RFC2889_LOCATIONS="//10.1.1.1/1/1,//10.1.1.1/2/2"
Other Configurations are :
TRAFFICGEN_STC_RFC2889_MIN_LR = 1488
TRAFFICGEN_STC_RFC2889_MAX_LR = 14880
TRAFFICGEN_STC_RFC2889_MIN_ADDRS = 1000
TRAFFICGEN_STC_RFC2889_MAX_ADDRS = 65536
TRAFFICGEN_STC_RFC2889_AC_LR = 1000
The first 2 values are for address-learning test where as other 3 values are for the Address caching capacity test. LR: Learning Rate. AC: Address Caching. Maximum value for address is 16777216. Whereas, maximum for LR is 4294967295.
Results for RFC2889 Tests: Forwarding tests outputs following values:
TX_RATE_FPS : "Transmission Rate in Frames/sec"
THROUGHPUT_RX_FPS: "Received Throughput Frames/sec"
TX_RATE_MBPS : " Transmission rate in MBPS"
THROUGHPUT_RX_MBPS: "Received Throughput in MBPS"
TX_RATE_PERCENT: "Transmission Rate in Percentage"
FRAME_LOSS_PERCENT: "Frame loss in Percentage"
FORWARDING_RATE_FPS: " Maximum Forwarding Rate in FPS"
Whereas, the address caching test outputs following values,
CACHING_CAPACITY_ADDRS = 'Number of address it can cache'
ADDR_LEARNED_PERCENT = 'Percentage of address successfully learned'
and address learning test outputs just a single value:
OPTIMAL_LEARNING_RATE_FPS = 'Optimal learning rate in fps'
Note that ‘FORWARDING_RATE_FPS’, ‘CACHING_CAPACITY_ADDRS’, ‘ADDR_LEARNED_PERCENT’ and ‘OPTIMAL_LEARNING_RATE_FPS’ are the new result-constants added to support RFC2889 tests.
4. Latency Histogram. To enable latency histogram as in results, enable latency_histogram in conf/03_traffic.conf.
'Latency_hisotgram':
{
    "enabled": True,
    "tpe": "Default,
}
Once, enabled, a ‘Histogram.csv’ file will be generated in the results folder. The Histogram.csv will include latency histogram in the following order. (a) Packet size (b) Ranges in 10ns (c) Packet counts. These set of 3 lines, will be repeated for every packet-sizes.
3.6. Xena Networks
3.6.1. Installation
Xena Networks traffic generator requires specific files and packages to be installed. It is assumed the user has access to the Xena2544.exe file which must be placed in VSPerf installation location under the tools/pkt_gen/xena folder. Contact Xena Networks for the latest version of this file. The user can also visit www.xenanetworks/downloads to obtain the file with a valid support contract.
Note VSPerf has been fully tested with version v2.43 of Xena2544.exe
To execute the Xena2544.exe file under Linux distributions the mono-complete package must be installed. To install this package follow the instructions below. Further information can be obtained from https://www.mono-project.com/docs/getting-started/install/linux/
rpm --import "http://keyserver.ubuntu.com/pks/lookup?op=get&search=0x3FA7E0328081BFF6A14DA29AA6A19B38D3D831EF"
yum-config-manager --add-repo http://download.mono-project.com/repo/centos/
yum -y install mono-complete-5.8.0.127-0.xamarin.3.epel7.x86_64
To prevent gpg errors on future yum installation of packages the mono-project repo should be disabled once installed.
yum-config-manager --disable download.mono-project.com_repo_centos_
3.6.2. Configuration
Connection information for your Xena Chassis must be supplied inside the
10_custom.conf or 03_custom.conf file. The following parameters must be
set to allow for proper connections to the chassis.
TRAFFICGEN_XENA_IP = ''
TRAFFICGEN_XENA_PORT1 = ''
TRAFFICGEN_XENA_PORT2 = ''
TRAFFICGEN_XENA_USER = ''
TRAFFICGEN_XENA_PASSWORD = ''
TRAFFICGEN_XENA_MODULE1 = ''
TRAFFICGEN_XENA_MODULE2 = ''
3.6.3. RFC2544 Throughput Testing
Xena traffic generator testing for rfc2544 throughput can be modified for different behaviors if needed. The default options for the following are optimized for best results.
TRAFFICGEN_XENA_2544_TPUT_INIT_VALUE = '10.0'
TRAFFICGEN_XENA_2544_TPUT_MIN_VALUE = '0.1'
TRAFFICGEN_XENA_2544_TPUT_MAX_VALUE = '100.0'
TRAFFICGEN_XENA_2544_TPUT_VALUE_RESOLUTION = '0.5'
TRAFFICGEN_XENA_2544_TPUT_USEPASS_THRESHHOLD = 'false'
TRAFFICGEN_XENA_2544_TPUT_PASS_THRESHHOLD = '0.0'
Each value modifies the behavior of rfc 2544 throughput testing. Refer to your Xena documentation to understand the behavior changes in modifying these values.
Xena RFC2544 testing inside VSPerf also includes a final verification option. This option allows for a faster binary search with a longer final verification of the binary search result. This feature can be enabled in the configuration files as well as the length of the final verification in seconds.
..code-block:: python
TRAFFICGEN_XENA_RFC2544_VERIFY = False TRAFFICGEN_XENA_RFC2544_VERIFY_DURATION = 120
If the final verification does not pass the test with the lossrate specified it will continue the binary search from its previous point. If the smart search option is enabled the search will continue by taking the current pass rate minus the minimum and divided by 2. The maximum is set to the last pass rate minus the threshold value set.
For example if the settings are as follows
..code-block:: python
TRAFFICGEN_XENA_RFC2544_BINARY_RESTART_SMART_SEARCH = True TRAFFICGEN_XENA_2544_TPUT_MIN_VALUE = ‘0.5’ TRAFFICGEN_XENA_2544_TPUT_VALUE_RESOLUTION = ‘0.5’
and the verification attempt was 64.5, smart search would take 64.5 - 0.5 / 2. This would continue the search at 32 but still have a maximum possible value of 64.
If smart is not enabled it will just resume at the last pass rate minus the threshold value.
3.6.4. Continuous Traffic Testing
Xena continuous traffic by default does a 3 second learning preemption to allow the DUT to receive learning packets before a continuous test is performed. If a custom test case requires this learning be disabled, you can disable the option or modify the length of the learning by modifying the following settings.
TRAFFICGEN_XENA_CONT_PORT_LEARNING_ENABLED = False
TRAFFICGEN_XENA_CONT_PORT_LEARNING_DURATION = 3
3.6.5. Multistream Modifier
Xena has a modifier maximum value or 64k in size. For this reason when specifying Multistream values of greater than 64k for Layer 2 or Layer 3 it will use two modifiers that may be modified to a value that can be square rooted to create the two modifiers. You will see a log notification for the new value that was calculated.
3.7. MoonGen
3.7.1. Installation
MoonGen architecture overview and general installation instructions can be found here:
https://github.com/emmericp/MoonGen
Note: Today, MoonGen with ViNePerf only supports 10Gbps line speeds.
For ViNePerf use, MoonGen should be cloned from here (as opposed to the previously mentioned GitHub):
git clone https://github.com/atheurer/lua-trafficgen
and use the master branch:
git checkout master
ViNePerf uses a particular Lua script with the MoonGen project:
trafficgen.lua
Follow MoonGen set up and execution instructions here:
https://github.com/atheurer/trafficgen/blob/master/README.md
Note one will need to set up ssh login to not use passwords between the server running MoonGen and the device under test (running the ViNePerf test infrastructure). This is because ViNePerf on one server uses ‘ssh’ to configure and run MoonGen upon the other server.
One can set up this ssh access by doing the following on both servers:
ssh-keygen -b 2048 -t rsa
ssh-copy-id <other server>
3.7.2. Configuration
Connection information for MoonGen must be supplied inside the
10_custom.conf or 03_custom.conf file. The following parameters must be
set to allow for proper connections to the host with MoonGen.
TRAFFICGEN_MOONGEN_HOST_IP_ADDR = ""
TRAFFICGEN_MOONGEN_USER = ""
TRAFFICGEN_MOONGEN_BASE_DIR = ""
TRAFFICGEN_MOONGEN_PORTS = ""
TRAFFICGEN_MOONGEN_LINE_SPEED_GBPS = ""
3.8. Trex
3.8.1. Installation
Trex architecture overview and general installation instructions can be found here:
https://trex-tgn.cisco.com/trex/doc/trex_stateless.html
You can directly download from GitHub:
git clone https://github.com/cisco-system-traffic-generator/trex-core
and use the same Trex version for both server and client API.
NOTE: The Trex API version used by ViNePerf is defined by variable TREX_TAG
in file src/package-list.mk.
git checkout v2.38
or Trex latest release you can download from here:
wget --no-cache http://trex-tgn.cisco.com/trex/release/latest
After download, Trex repo has to be built:
cd trex-core/linux_dpdk
./b configure   (run only once)
./b build
Next step is to create a minimum configuration file. It can be created by script dpdk_setup_ports.py.
The script with parameter -i will run in interactive mode and it will create file /etc/trex_cfg.yaml.
cd trex-core/scripts
sudo ./dpdk_setup_ports.py -i
Or example of configuration file can be found at location below, but it must be updated manually:
cp trex-core/scripts/cfg/simple_cfg /etc/trex_cfg.yaml
For additional information about configuration file see official documentation (chapter 3.1.2):
https://trex-tgn.cisco.com/trex/doc/trex_manual.html#_creating_minimum_configuration_file
After compilation and configuration it is possible to run trex server in stateless mode. It is neccesary for proper connection between Trex server and ViNePerf.
cd trex-core/scripts/
./t-rex-64 -i
NOTE: Please check your firewall settings at both DUT and T-Rex server. Firewall must allow a connection from DUT (ViNePerf) to the T-Rex server running at TCP port 4501.
NOTE: For high speed cards it may be advantageous to start T-Rex with more transmit queues/cores.
cd trex-cores/scripts/
./t-rex-64 -i -c 10
For additional information about Trex stateless mode see Trex stateless documentation:
https://trex-tgn.cisco.com/trex/doc/trex_stateless.html
NOTE: One will need to set up ssh login to not use passwords between the server running Trex and the device under test (running the ViNePerf test infrastructure). This is because ViNePerf on one server uses ‘ssh’ to configure and run Trex upon the other server.
One can set up this ssh access by doing the following on both servers:
ssh-keygen -b 2048 -t rsa
ssh-copy-id <other server>
3.8.2. Configuration
Connection information for Trex must be supplied inside the custom configuration file. The following parameters must be set to allow for proper connections to the host with Trex. Example of this configuration is in conf/03_traffic.conf or conf/10_custom.conf.
TRAFFICGEN_TREX_HOST_IP_ADDR = ''
TRAFFICGEN_TREX_USER = ''
TRAFFICGEN_TREX_BASE_DIR = ''
TRAFFICGEN_TREX_USER has to have sudo permission and password-less access. TRAFFICGEN_TREX_BASE_DIR is the place, where is stored ‘t-rex-64’ file.
It is possible to specify the accuracy of RFC2544 Throughput measurement. Threshold below defines maximal difference between frame rate of successful (i.e. defined frameloss was reached) and unsuccessful (i.e. frameloss was exceeded) iterations.
Default value of this parameter is defined in conf/03_traffic.conf as follows:
TRAFFICGEN_TREX_RFC2544_TPUT_THRESHOLD = ''
T-Rex can have learning packets enabled. For certain tests it may be beneficial to send some packets before starting test traffic to allow switch learning to take place. This can be adjusted with the following configurations:
TRAFFICGEN_TREX_LEARNING_MODE=True
TRAFFICGEN_TREX_LEARNING_DURATION=5
Latency measurements have impact on T-Rex performance. Thus ViNePerf uses a separate
latency stream for each direction with limited speed. This workaround is used for RFC2544
Throughput and Continuous traffic types. In case of Burst traffic type,
the latency statistics are measured for all frames in the burst. Collection of latency
statistics is driven by configuration option TRAFFICGEN_TREX_LATENCY_PPS as follows:
value
0- disables latency measurements
- non zero integer value - enables latency measurements; In case of Throughput
and Continuous traffic types, it specifies a speed of latency specific stream in PPS. In case of burst traffic type, it enables latency measurements for all frames.
TRAFFICGEN_TREX_LATENCY_PPS = 1000
3.8.3. SR-IOV and Multistream layer 2
T-Rex by default only accepts packets on the receive side if the destination mac matches the MAC address specified in the /etc/trex-cfg.yaml on the server side. For SR-IOV this creates challenges with modifying the MAC address in the traffic profile to correctly flow packets through specified VFs. To remove this limitation enable promiscuous mode on T-Rex to allow all packets regardless of the destination mac to be accepted.
This also creates problems when doing multistream at layer 2 since the source macs will be modified. Enable Promiscuous mode when doing multistream at layer 2 testing with T-Rex.
TRAFFICGEN_TREX_PROMISCUOUS=True
3.8.4. Card Bandwidth Options
T-Rex API will attempt to retrieve the highest possible speed from the card using internal calls to port information. If you are using two separate cards then it will take the lowest of the two cards as the max speed. If necessary you can try to force the API to use a specific maximum speed per port. The below configurations can be adjusted to enable this.
TRAFFICGEN_TREX_FORCE_PORT_SPEED = True
TRAFFICGEN_TREX_PORT_SPEED = 40000 # 40 gig
Note:: Setting higher than possible speeds will result in unpredictable behavior when running tests such as duration inaccuracy and/or complete test failure.
3.8.5. RFC2544 Validation
T-Rex can perform a verification run for a longer duration once the binary search of the RFC2544 trials have completed. This duration should be at least 60 seconds. This is similar to other traffic generator functionality where a more sustained time can be attempted to verify longer runs from the result of the search. This can be configured with the following params
TRAFFICGEN_TREX_VERIFICATION_MODE = False
TRAFFICGEN_TREX_VERIFICATION_DURATION = 60
TRAFFICGEN_TREX_MAXIMUM_VERIFICATION_TRIALS = 10
The duration and maximum number of attempted verification trials can be set to change the behavior of this step. If the verification step fails, it will resume the binary search with new values where the maximum output will be the last attempted frame rate minus the current set thresh hold.
3.8.6. Scapy frame definition
It is possible to use a SCAPY frame definition to generate various network protocols by the T-Rex traffic generator. In case that particular network protocol layer is disabled by the TRAFFIC dictionary (e.g. TRAFFIC[‘vlan’][‘enabled’] = False), then disabled layer will be removed from the scapy format definition by ViNePerf.
The scapy frame definition can refer to values defined by the TRAFFIC dictionary by following keywords. These keywords are used in next examples.
Ether_src- refers toTRAFFIC['l2']['srcmac']Ether_dst- refers toTRAFFIC['l2']['dstmac']IP_proto- refers toTRAFFIC['l3']['proto']IP_PROTO- refers to upper case version ofTRAFFIC['l3']['proto']IP_src- refers toTRAFFIC['l3']['srcip']IP_dst- refers toTRAFFIC['l3']['dstip']IP_PROTO_sport- refers toTRAFFIC['l4']['srcport']IP_PROTO_dport- refers toTRAFFIC['l4']['dstport']Dot1Q_prio- refers toTRAFFIC['vlan']['priority']Dot1Q_id- refers toTRAFFIC['vlan']['cfi']Dot1Q_vlan- refers toTRAFFIC['vlan']['id']
In following examples of SCAPY frame definition only relevant parts of TRAFFIC
dictionary are shown. The rest of the TRAFFIC dictionary is set to default values
as they are defined in conf/03_traffic.conf.
Please check official documentation of SCAPY project for details about SCAPY frame definition and supported network layers at: https://scapy.net
Generate ICMP frames:
'scapy': {
    'enabled': True,
    '0' : 'Ether(src={Ether_src}, dst={Ether_dst})/IP(proto="icmp", src={IP_src}, dst={IP_dst})/ICMP()',
    '1' : 'Ether(src={Ether_dst}, dst={Ether_src})/IP(proto="icmp", src={IP_dst}, dst={IP_src})/ICMP()',
}
Generate IPv6 ICMP Echo Request
'l3' : {
    'srcip': 'feed::01',
    'dstip': 'feed::02',
},
'scapy': {
    'enabled': True,
    '0' : 'Ether(src={Ether_src}, dst={Ether_dst})/IPv6(src={IP_src}, dst={IP_dst})/ICMPv6EchoRequest()',
    '1' : 'Ether(src={Ether_dst}, dst={Ether_src})/IPv6(src={IP_dst}, dst={IP_src})/ICMPv6EchoRequest()',
}
Generate TCP frames:
Example uses default SCAPY frame definition, which can reflect
TRAFFIC['l3']['proto']settings.'l3' : { 'proto' : 'tcp', },